Friday, August 23, 2013

Magic Wands


"Salagadoola mechicka boola bibbidi-bobbidi-boo
It'll do magic believe it or not
bibbidi-bobbidi-boo."
 
With a flip of their magic wand your kiddo will make their breakfast disappear... into thier bellies of course. Your little sorcerer might even be able to make you hop up and down on one leg, bark like a dog or even fly! See what they can do.
 
Moreoever, as a parent what could be more magical then getting food into your kiddo as you are running out the door late for school or that early morning soccer game.
 
 
What you need:
  • 4 sausage links
  • 2 waffles (frozen are easiest!)
  • 1 banana
  • 1/4 cup of berries
  • Real maple syrup (come on, your kids deserve the real stuff not that high fructose corn syrup!!)
  • 4 popsicle sticks
 
Directions:
 
Cook the sausages and the waffles as directed on the packages. Then cut them into pieces. Cut bananas into 1/2 inch thick bites. Using popsicle sticks skewer each food item until the stick is filled. Drizzle some syrup onto each stick. Then grab them and go, go, go!!
 
There is no Food Play activity because you are headed out the door!


Monday, August 19, 2013

Rattlesnake


Living in Arizona rattlesnakes are just a given. They can be lurking around any rock, in your pool, by the swingset, under your car or in your kitchen! I am totally freaked out right now just thinking about it!
 
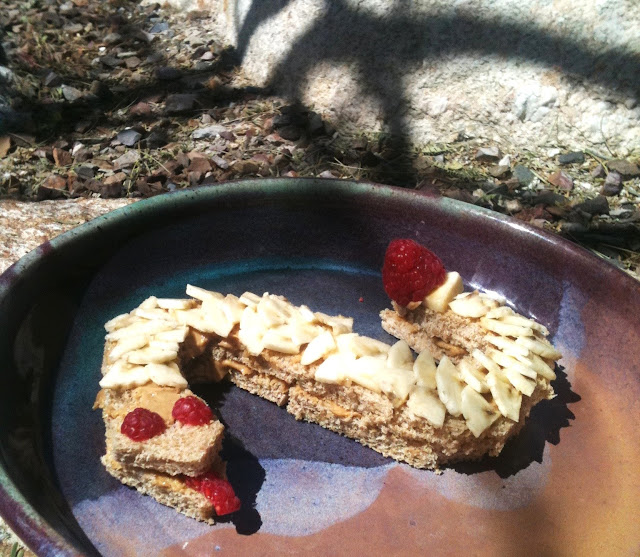
Making funny sandwiches is nothing new. But when your sandwich could bite back it defintely gets your attention. So, let them eat snake!
 

What you need:
  •  2 slices of bread
  • peanut/almond/soynut butter
  •     1 banana
  •     2 raspberries 


Directions:


 Cut the crust off the slices of bread


Spread the bread with your favorite nut butter. Then cut into 6 pieces.

 
Arrange your pieces into a snake like pattern.
 
Quarter your banana and cut thin scale shaped slices. Places the scales along the snake. To help them stay in place better you can spread some of the nut butter on the top of the bread too!
 
Once you have the scales in place use a dab of the nut butter to stick on your rattle (raspberry.) Shape the head of the snake into a diamond shape and add a slithering snake tongue and some serpentine eyes!


FOOD PLAY ALERT: SNAKE!!
 
Paper Ring Snake. Let them eat snake and let them play snake! Here is a fun and easy snake craft to get your little one speaking parseltongue in no time. You don't know what that is?...eh, don't worry about it!


All you need is some paper cut into strips, glue and googly eyes if you got them (a black pen workes well too.)
 
Put a dab of glue on the edge of the paper strip and bring other end over to make a ring. Make sure with teh next one you loop it through the first ring before sealing the ring with glue. Continue until the snake is as long as you want it.
 
 
 Add some eyes, make a tongue and even a paper rattle and there you have it.
 
 
Ahhhh snake!!!!
 

Tuesday, August 13, 2013

I Want My Mummy!


Meatloaf is just about the most boring food ever. Think about it..."here you go kid, your loaf of meat is ready." While most kids already like meatloaf (my daughter claims it is her favorite food) it is in desperate need of a revamp. Meatloaf is getting mummified (minus any embalming substances!) So now that plain ol' loaf of meat has got a new twist and your kids will LOVE it!!  This is sure to spook them out and it isnt even Halloween yet! 
 
What you need:
For meatloaf:
  • 1 egg, beaten
  • 1 TBS ketchup
  • 1 TBS dijon mustard
  • 1 Tsp Worchestire Sauce
  • 1 medium onion, grated (using a cheese grater makes cutting up an onion easier)
  • 2 cloves of garlic, minced
  • salt and pepper
  • 1 lb ground beef
  • 1 cup breadcrumbs
  • optional: 1 diced roasted red pepper (I add it to my meatloaf and it adds a little something special.)
For mummy wraps:
  • 1 premade pie crust
  • 1 egg, beaten
 
Directions:
 
Preheat oven to 400 degrees.
 
In a large bowl mix together egg, ketchup, mustard, Worchestire, onion, garlic, salt and pepper, red pepper.  Then add ground beef to the mixture. Lastly, mix in breadcrumbs. Put your loaf of meat into a loaf pan.
 
Bake for 35-40 minutes.
 
Take meatloaf out of the oven and allow to cool.

Now it's time to make your mummy. Don't worry no need for any canopic jars here (FYI, Canopic jars were used by the ancient Egyptians during the mummification process to store and preserve parts of their pre-mummy owner for the afterlife. What?! Too much information.)

Unroll your thawed pie crust.


Place 1 inch wide slices of meat down the center of the crust. Make sure to leave at least an inch on the top and the bottom.


With a sharp knife cut 1/2 to 1 inch slices down both sides of the pie crust, cutting from the meat to the outer edge. Fold these "mummy wraps" over the meat loaf.

Once all "mummy wraps" are in place, make your mummies face. Here I used ketchup for the face and cut green peppers for the eyes (you could also use sliced olives, pieces of the pie crust dough, cheerios, whatever...) Last thing to do is to brush some egg on the dough to make it brown up nicely.
 

 And there you have your yummy mummy. And if you are wondering, yes, the pie crust makes the meatloaf taste amazing!


That meatloaf is kkkrrazzyyy!

FOOD PLAY ALERT:
I thought doing a heiroglyphic game would be really fun here. Then I thought of an easier and less educational activity to do with your kiddos in conjunction with your Monday Mummy Meatloaf night.
 
All you need is some rolls of toilet paper and a willing participant. I got both my girls mummied up and now everytime they follow me into the bathroom they try to wrap themselves in toilet paper. I did have them wrap me up but I couldnt take a picture of me with my arms pinned to my sides.




Friday, August 2, 2013

Banana Boat

Nutella, which we affectionately call 'chocolate spread,'  is a fan favorite in our house. If my daughter had her way she would eat gobs of it right off the spoon for every meal. As a good mother I lovingly spread it on a piece of whole wheat bread in hopes of providing a more well balanced snack. She of course eats off the spread leaving a mangled piece of bread behind.


This morning was going to be no different of course. And then, I decided to try a 'chocolate spread' sandwich with sliced bananas. It was delicious! As I sat there looking at the banana I realized that I had a new vessel for delivering the glorious Nutella. At worst I would find a mangled, mushy piece of banana left behind, probably smashed into the rug somewhere. At best I would get some fruit into that child of mine.

I quickly hollowed out the banana with a melon baller and filled it in with the Nutella. It was a moment of spontaneous genius! I had to take pictures of it to share with all of you. And yes, the pictures do look a bit creepy.
 
Hollow out the banana and fill in with nutella.

My daughter absolutely loved this! And she ate every bite of it. No smashed banana left behind!


So yummy!
Almost done and still wants more.


Enjoy!

Thursday, August 1, 2013

Tic Tac Toe


Cracker tic-tac-toe is all about playing with your food, literally. All it takes is a little creative spirit from you and your kiddo. Your creative energy will be spent on deciding what to use as your Xs and Os. The choices are endless: cheese. hummus, peanut butter, mini pizzas, apple slices, bananas, lions, tigers, bears.... oh my! While you are struggling with this big decision the little one can be designing their game board.

What you need:
  • 10 cracker game pieces (5 Xs and 5 Os) and more for eating during the game
  • Choice of toppings - I used cheddar cheese and used cut outs to make the shapes.

For the game board:
  • paper
  • tape
  • paint
  • ziploc baggie
1. Place tape on a piece of paper in the shape of a tic tac toe board.
2. Have your kiddo paint all over the paper and then let it dry.
3. Peel off the tape and, voila, your game board is almost ready.
4. Use a large ziploc baggie to protect your game board from spills and messes. You can use contact paper if you've got it but, the plastic bag is so much easier!
5. Your game board is ready for playing!


I taught my little one the rules of the game which are simple; get 3 in a row. It would have gone a lot smoother if she didnt keep eating the pieces. Be sure to have some extra ones just in case your gamer gets hungry too!
So fun and easy a 3 year old can do it!

3 in a row! She wins...again!

What a game! Let's do it again.